Table of ContentsGarage Door Springs Need To Know InfoGarage Door Spring And Cable Repair Project With StepsAdjusting Garage Door SpringsReplacing A Broken Garage Door Spring
We regularly get calls about springs coming loose from the cones at about 6 turns. If this takes place, change the springs. 10. 2 Tape your winding bars if you have actually not done so currently, not only to ensure that you are placing the bars entirely into the cones as you wind the torsion springs, however more importantly to guarantee that the bar does not slip out of the cone when you stretch the springs at the end.
 Garage Door Spring Adjustment: How To Adjust & Tighten
Experts always stretch torsion garage door repair and services Tucson springs after winding them due to the fact that the shaft drifts horizontally between the versatile end bearing plates as the door runs. Although this may be as little as 1/4", the binding of the coils as the garage door closes usually keeps the door from closing entirely, specifically when the torsion springs and bearings are dry.
3 At this point you will wind the spring. Notice that the end of the spring on the winding cone points up when facing you. You will wind both emerge and counter intuitively as if you are attempting to unscrew the winding cones from the ends of the springs.
This is your first quarter turn. Count "one." Next, place the bar and raise it 90 degrees. Place the 2nd bar. This is "two." As you wind the spring it need to grow in length the thickness of one coil for each turn. The cone must cover your mark after the first couple turns.
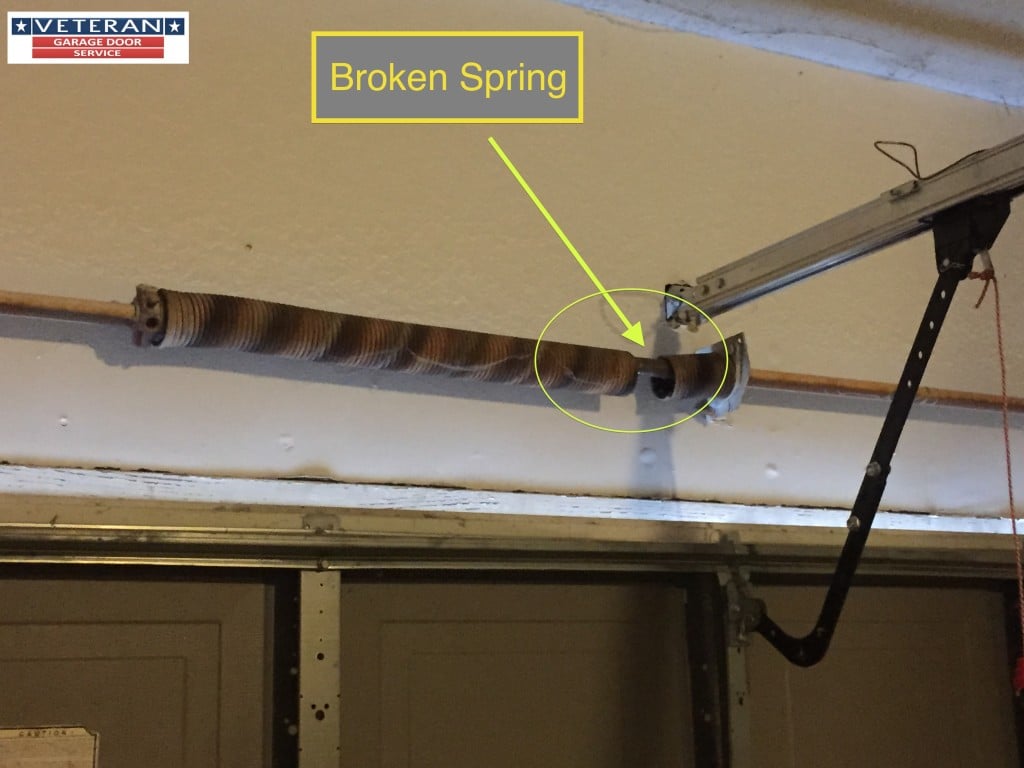
Garage Door Spring Unwound
 Adjusting Garage Door Springs: Instruction For Do-it-yourselfers
10. 4 Raise the second bar 90 degrees and insert the first bar. This is "three." Continue winding. If the spring shortens in length, loosen up the spring and switch sides - the springs are on backwards. Otherwise, continue winding up until you reach a count of "30." This is 7 1/2 turns, which is regular for most 7' doors. 5 If the spring comes loose from the cone at about 6 turns, you are probably winding the spring backwards due to the fact that the springs are on the incorrect sides. Switch the springs. Otherwise, after winding the torsion springs, you will need to stretch the springs and protect the winding cone. Initially, mark the shaft 1/4" beyond the winding cone with tape or with a file.
Although this may be as low as 1/4" the binding of the coils as the door closes typically keeps the door from closing entirely, especially when the springs and bearings are dry and need lubrication. 10. 6 Here you will need to do three things at once. With your left hand, lift the bar just off the top of the door and pull it towards the center of the garage door.
Pulling the bar back toward the center of the door as you tap triggers the spring cone to bind on the shaft and not slip back. 10. 7 Continue tapping up until the cone moves out to the mark on the shaft. Continue holding the bar off the garage door and drawing back toward the center of the door.
Watch on the tape to make certain the bar doesn't slip out of the cone. If it does begin to slip, rest the bar against the top of the garage door, insert a bar in the next hole and turn the cone up enough to make it possible for you to press the marked bar back into place.
Garage Door Springs
8 After the cone reaches the mark, continue pulling the bar off the garage door and back toward the middle of the door with your left hand. Tighten both set screws 1/2 to 3/4 turns each after each screw initially satisfies the shaft. This is the point at which you will feel the screw conference resistance.
Residential torsion springs are stretched 1/8" to 1/4". Bigger commercial and industrial overhead garage door torsion springs are extended as much as an inch. 10. 9 Thoroughly evaluate the set screws by pulling down on the bar. The winding cone should be tight enough so that when you pull down on the bar, the garage door should begin to lift.
10. 10 Remove the vise grip from the shaft. 10. 11 Vise grip the vertical track about 3" above one of the rollers. If you have set up the incorrect springs, or if you have over-wound the springs, this will avoid the garage door from flying up and knocking you off your ladder garage door installation instructions video after winding the 2nd torsion spring.
10. 12 Follow the very same treatment for winding the 2nd spring, extending it 1/4", and securing the set screws. CAUTION: Before removing the bars from the cones after protecting the winding cone, you need to run an important test of the door. Much of the mishaps that happen while repairing springs are because of installing springs that are too strong.
How To Adjust The Garage Door Spring
 How To Tighten And Adjust Garage Door Cables
13 Gradually take down on the winding bar till the garage door rises 3" and the roller strikes the vise grip on the track. The door will typically hang back down and raise the bar. If it does not, raise completion of the bar till the door closes. If the door shows up by itself when you hold the bar gently, the http://garrettlrzd051.theglensecret.com/2020-garage-door-spring-replacement-repair-cost springs are either over injury or they are too strong.
If the door comes up on its own, you either need to numerous turns on the springs or you have the wrong springs. This can be extremely harmful. We advise getting professional assistance. Eliminating the winding bar could trigger the garage door to knock you off the ladder. 10. 14 If the door remains on the floor when you raise the bar, remove the bar from the cone.